I do a number of different types of blog posts. The three main ones are outfit posts, reviews and collages. Outfit posts get more comments and love on Facebook but collages get more pinterest shares and generate more traffic over time. Collages are a great way to illustrate a post when you don’t have an original graphic of your own to use too. I use collages to talk about everything from emerging fashion trends to gift guides and packing lists.
Most tutorials on how to make a collage include using some fancy photo software like Photoshop. Here is a blog secret I don’t own any fancy photo editing software. I use power point and picmonkey to create all my collages. This is how to make a collage without photoshop. 
How to Make a Collage without Photoshop
- Open power point and start a blank presentation.
- Copy and paste images you want to use for your collage into your blank power point.

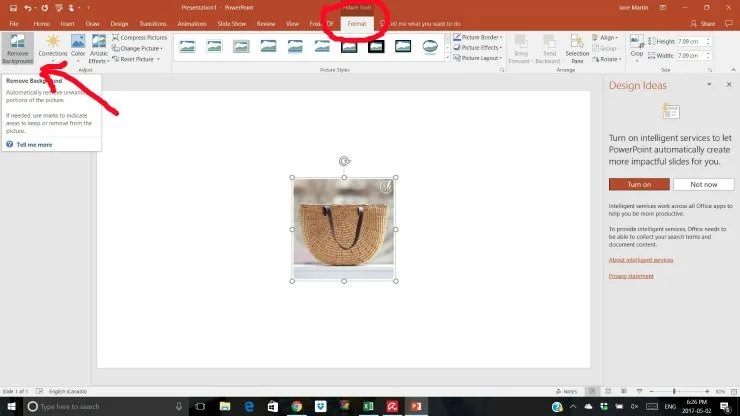
- If you want to get rid of an ugly background select the photo and choose picture tools (circled above).
- Next remove the background (arrow points to where you find this option). Sometimes you have to mark areas to keep or remove more than initially done by the program. I find this option is best in the newest versions of power point so make sure to update to the latest.
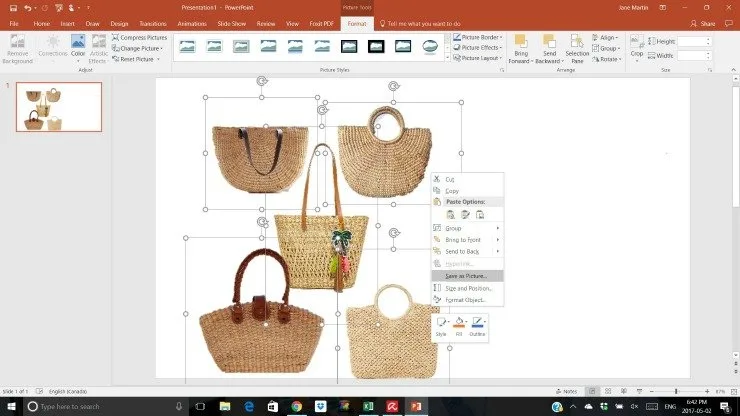
- Organize the photos how you want them to look. If you removed the backgrounds of the photos you can have some overlap. The program will indicate with red lines when you have the images lined up vertically or horizontally. Use this to your advantage.

- Once you have all your photos arranged how you want them group them then save as a photo. Use the control key to select all your photos. Right click on one of the selected group to group the photos as one, then save the grouped image as a photo.
- Now open your favourite photo editing software. My favourites are Picmonkey and Canva. Both have loads of awesome free options. I do pay the $30 per year for the upgraded features of Picmonkey.
- Use the photo editor to add text to enhance the collage. Layer a graphic and increase it’s transparency. Resize to fit your blog post.
Collages can take quite a bit of work. Aside from the arranging I talk about here, there is time spent sourcing all the photos you want to share. Linking out to the affiliate content, writing up the posts themselves. My collage posts tend to be longer than what I talk about in an outfit posts. But spending all the time to create this content is worthwhile. Collage posts are heavily shared on Pinterest and make excellent Evergreen content that will please the traffic gods.
Now that you know how to make a collage without photoshop will you follow these steps? Do you have another method? Share in the comments!

Robin Thigpen
Friday 10th of July 2020
Can you add the products link with the photo on picmonkey?
Jane
Friday 10th of July 2020
No that is something you can do with your affiliate program though. If you use rewardstyle you can do it there.